Week one - 3 Main Things To Photography! - 20th September
When taking a photograph there are 3 main things that you have to take into consideration, these 3 things are:-
- Juxtaposition
- Visual Irony
- Decisive Moment
First Juxtaposition- this is stacking things up within the image to make it the final image. Second Visual Irony- this is where you mind is trying to work the image out, so whats happening in the photograph. And lastly is the Decisive Moment- this is simply knowing when to press the button to capture the image you are wanting to get.
A photographer who is an example of these 3 things is Matt Stuart. Here below are some images of his work. -


This is quote from Matt Stuart that i have found, which i quite like, which explains a bit where he does the work that he does. - "I am not sure which came first, being nosey or an interest in ‘street photography’, but a fascination with people and the way they live their lives is why I enjoy the business so much."
Week 2 - Weekly Picture Project "Blackburn"- 27th September
For our first Weekly Picture Project, we were set task to go out around Blackburn and to take 3 different pictures of things that we haven't seen before, or things that we have seen but noticed them in a different way.
We were given the place of Blackburn because we done live there, and don't see it everyday,it is an unfamiliar place to us.
For this project though i only managed to take 2 images.
For my images i tried to take pictures of things that were well known round Blackburn and also of things that people who are from Blackburn would recognise straight away.
My first Image I took was of the "Gladstone- 1809 - 1898 statue". I took this image because the statue is right in the centre and i thought that most people would know it as soon as they saw it.

The second image that i took, also had to be taken in Blackburn, but for this image i took the image of the university itself. Instead of just taking a picture of the building i decided to take it in a bit of different way, so instead i took it of the side of the building where it has the writing "Blackburn University". For this image instead of taking it from straight on, i thought it would look a bit more interesting if i took it from pointing upwards.

Week 3 - Camera Information - 4th October
In this weeks seminar we went through and discussed the different types of cameras there are and the settings that are on the different cameras and also the pros and cons with these cameras.
Also in this lecture we discussed the different settings, some of these setting were things like:-
- ISO - ISO stands for International Standards Organisation. The ISO measures the sensitivity of the image sensor. The ISO is measured in numbers - 100, 200, 400, 800, and 1600. the lower the number the less sensitive your camera is to light and the finer the grain. Higher ISO settings are generally used in darker situations to get faster shutter speeds.
- Aperture - Aperture is a hole or an opening through which light travels, aka Aperture is ‘the size of the opening in the lens when a picture is taken. Aperture is measured in ‘f-stops’. For example these are 'F-Stops' - f/2.8, f/4, f/5.6,f/8,f/22.
- Shutter Speed - The shutter is what determines the duration the sensor is exposed to light. Shutter speed is usually expressed as a fraction - 1/2, 1/4, 1/30, 1/60. A shutter speed of 1/4 means that the shutter is in the open stage for a period of one quarter of a second, whereas a shutter speed of 1/2000 means it is open for only one two thousandth of a second. The longer the shutter is open, the more light is hitting the sensor.
At the end of this seminar, we also discussed what makes and good portrait photograph and what doesn't. we discussed this because our picture project for this week is to take a black and white portrait image.

Week 4 - Weekly Picture Project "Portraits"- 11th October
In this weeks Systems and Processes seminar it was the weekly Picture Project. For this week we had to produce one black and white portrait image with the lowest aperture we could possibly get e.g 1.8, also with these image we had to try and achieve the Bokeh effect in the background of the photograph.
While taking this portrait image we had to concentrate on the subjects eyes, we did this so that the image itself would look to have more meaning.
For my portrait image i decided to photograph my 1yr old nephew Finlay, I decided to photograph Finaly because even though he wouldn't sit still for a long amount of time the image would still be natural (un -posed) and real because he doesn't really know what's going on.
Here is the final image of Finaly :-

I chose this image as my final one because i love the way he is looking up straight towards the camera and nothing else, he is not smiling or laughing or crying, he is just looking up at the camera. By him doing this i think it makes for a better photo and creats a certain mood for the viewer looking at it.
Week 5 - Landscapes - 18th October
In this weeks seminar we discussed the subject of "Landscapes" as it will be our weekly picture project for next week.
Within this seminar we spoke about many different things, these were things like :-
- Aesthetics
- Documenrty
- Picture Format
- Commercial Landscape Photographers
- Documentary Landscape Photographers
- Our Landscape Picture Project
First we spoke about 2 certain words,and what their meaning were, these were "Aesthetics" and "Documenrty". Aesthetics means....Is pleasing to the viewer (looks good) and Documenrty means..... There is a cause/ Point to the image that is being taken.
The picture formats that we discussed consisted of 4different types, these are :-
- Landscape rectangle
- Square
- Panoramic
- Portrait Rectangle
here below i have just added one picture for each different picture format to show an example:-


Some photographers that are well known for taking commercial Landscape images are:-
- Charlie Waite
- Joe Cornish
- David Ward
Even though these 3 photographers that i have mentioned above are all landscape photographers, they all only do it for purely Aesthetic reasons - (Pictorialism).
Here are some example of purely Aesthetic photographs :-


Another type of landscape photography is Documentary Landscape. Documenrty landscape photography is the opposite to that of Commercial Landscape. Where as commercial is purely making a image to nice and pleasing to the viewer, Documenrty is where the images have a reason and a point for the photographer to take it in the first place.
Some Documentary photographers are :-
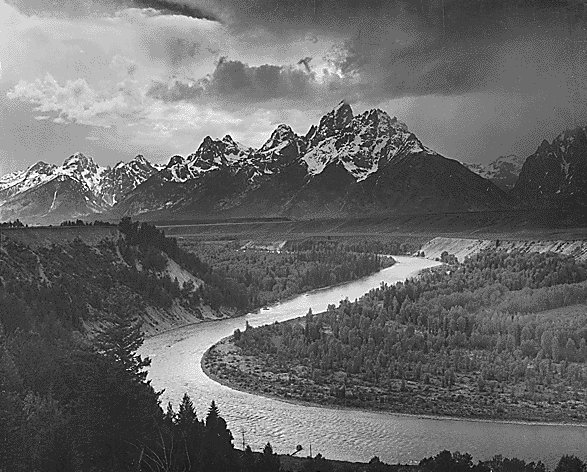
- Ansel Adams
- Walkers Evans
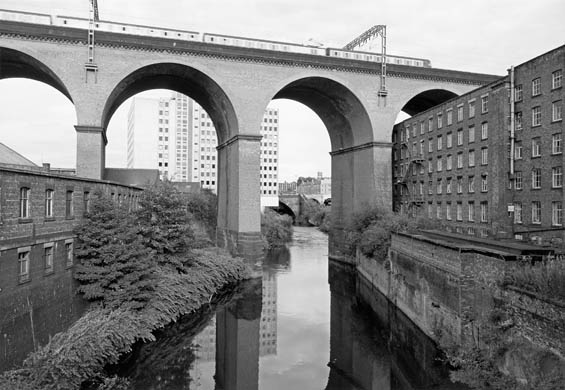
- John Davies
- John Blakemore
- Fay Godwin
- Paul Hill
Here are some example of their work:-


After researching these photographers and their work, i really enjoy Ansel Adams work the most. I like Ansel Adams work because there is nothing "Man Made" within his images, he just works with what is there already, and makes it look so much more interesting, and like no other photographers work.
Week 6 - Weekly Picture Project "Landscapes" - 1st November
This weeks Weekly Picture Project was Landscapes, I had to go out and take a Long Exposure landscape image.
For this project we had certain settings that we had to try while taking this image of our landscapes. These setting were :-
- 100/200 ISO
- RAW
- TV/ Manual
- Day Light Colour Setting
- Tripod
- Spot Metre Setting
Here are my final images of landscapes :-


Week 7 - Vase of Flowers - 8th November
In this weeks seminar we were given the brief of "Vase of Flowers". We then went on to discuss this brief and what it entailed, This is the theme for our Weekly Picture Project for next week.
In this seminar we first talked about an artist called "Robert Mapplethorpe". This was an artist that was known for his work of "Flowers" but also for his work of "Male Sexuality". Here i have just added below some images of his work.


Another artist that we looked at that has taken iconic images of flowers is that of, Andre Kertesz. Andre Kertesz was a painter originally but took a very iconic image of this Vase of Flowers. Andre Kertesz not only painted and took pictures of flowers but was also known for taking simple objects and making them into a Aesthetic photograph.
Here below is some of his work-


In this seminar, as well as looking at photographers who photographed flowers, we also looked at some painters who painted flowers and vases.
One of these painters were Pabol Picasso. He was as a Spanish expatriate painter,sculptor, printmaker, ceramicist, and stage designer, one of the greatest and most influential artists of the 20th century.
Here below is an image of his work that relates to the subject in some way of vase of flowers. The image i have picked, i picked because he is using still life objects like a vase and flowers.

Week 8 - Weekly Picture Project "Vase of Flowers" - 15th November
For this weeks weekly picture project, i had to take an image of "Flowers in a vase". Unlike past picture projects, this time we didn't have any certain settings that we had to use, and also this time we had the option either to take the image in black and white or colour.
For this project we were given full creative control for how we wanted out picture to turn out.
I chose to photograph White Roses, both in a white Jug and also in a 4 ball glass vase. For my image i tried many different set ups in the way that i would present the flowers and vase.
The setting that i used for taking my images were, AV, Aperture - 5.6 (around there - different for each image) and Shutter Speed - 1/30 (again around there , different for each image) and ISO - 1600 ( i had to have such a high exposure because i took them in my bedroom and it was too dark so i had to up the ISO).
I took my images both in black and white and also in colour. Here below are the 5 different photographs that i came out with at the end.


Week 9 - Great British - 22nd November
In this weeks theory seminar for our weekly picture project, we were given the theme of the picture we had to take during this week.
This weeks theme is "Great British". First we discussed the background history of Great Britain.
- Steadily we have reduced our world domination, but our language and post times survived.
- Sports - Football, Golf, Tennis, Rugby. (All english originated sports)
- Language - The english language is spoken through out all the world, most people's first or second language.
- Culture - Movies, Pop Music, Tv. All very important to the english culture.
- Industry and Invention - the english invented all Steam Engines, Jet Engines and light Bulbs etc.....
Next we went on to look at different photographers that photographed "Great British". The first we looked at was "Tony Ray Jones", Tony Ray-Jones studied at the London School of Printing, where he concentrated on graphic design. In the early 1960s he obtained a scholarship that enabled him to join Yale University School of Art on the strength of photographs he had taken in north Africa from a taxi window. Although only 19 on his arrival at Yale, Ray-Jones' talent was obvious, and in 1963 he was given assignments for the magazines Car and Driver and Saturday Evening Post.
Here is some of his photography work that shows the theme of "Great British".


The next photographer that we looked at was "Mark Power". He called his work "INDEXICAL". He called his work this because all of his work has an in Depth / Deep meaning.
The work that Mark is most known for is the work he did called "The Shipping Forecast". Between 1992 and 1996, Power embarked on The Shipping Forecast — a project that involved travelling to and photographing all 31 areas covered by the Shipping Forecast broadcast on BBC Radio 4.
Here are the pictures that he took for this piece of work.


Next we looked at Martin Parr and the worked that he produced with the theme of "Great British". Martin Parr (born 24 May 1952) is a British documentary Photographer, photojournalist and photobook collector. He is known for his photographic projects that take a critical look at aspects of modern life, in particular provincial and suburban life in England. He is a member of Magnum Photos.


We looked at another photographer called "Don McCullin". Don McCullin was known for his War Photography, we looked at his work during our seminar because even though he didn't produce photographs with the theme of "Great British", no-one has documented their country as well as he did with is own country, and we can see this with the war photos he took.


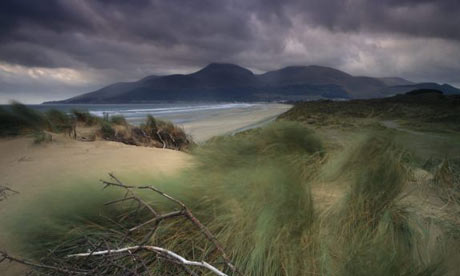
The last photographer that we looked at the took images that showed "Great British" was "Paul Wakefield". His work is different from the rest of photographers that i have researched because his work is not of people and showing the culture of the english, Paul's work is of the English landscapes. He produced 4 different books to show the character of Great Britain, Wales, Scotland, and Ireland.

After this seminar and researching all of these different photographers, I have come up with some different ideas of what i could photograph for my own image of "Great British".
Here are some of my ideas -
- Landscapes
- Pubs
- Steam Trains
- Fish and Chips
- Morcambe and Wise
- Blackpool Rock
- Markets
- Police Men
Week 10 - Weekly Picture Project "Great British" - 29th November
For this weeks "Weekly Picture Project" we were set the task of taking an image that represented the theme of "Great British". For this i had quite a few ideas of what i could take. so ended up taking quite a few different images.
Again like our last picture project of the Vase of Flowers, we were given complete creative control, we were allowed to decided the settings , whether it was in colour or black and white, and what the the thing was that we actually photographed.
This weeks theme i found both quite hard and simple, i found it quite hard because with living in Britain all my life, i think i take very british things for granted and then don't realise if some thing is british or not, but then on other hand i found it simple because very thing to photograph was right on my door step.
I originally wanted to take an image of people eating fish and chip or a fish and chips shop, because fish and chop are a very british food, you don't really get them anywhere else. but when taking the images, the final images that i produced i wasn't really pleased with how they turned out. Here are the ones i took -


Another idea i had that i thought represented Great british well was a traditional Red Post Box. With this image i first photographed the post box out side of some shop, but i didn't think the composition worked very well, so i went and found another one that was placed in front of a long row of bushes. I liked this one better because i thought you would look more at the Post Box and not at what is place behind it. Also with this image i added an action over the top of it in Photoshop, i did this because i wanted to improve the colours, because without it i thought i looked a bit boring and plain. Here is the image i took -

Another photograph that i took was of the Mayor and Mayoress of Rochdale. I wasn't planning on taking this image but while i was out taking another image they were out in Rochdale so i asked them if i could take a picture of them. I like how this image turned out because i also got the Town Hall in the background behind them. And i don't think you can more British than a Mayor and Mayoress. With this image i edited it a bit to make it look more interesting, i edited it by cropping it a bit and turning it black and white. Here is the image i took.

The last image that i took for the theme of "Great British" and the one the one that i used for my final image to be looked at was a picture i took of my dad in his British Police Uniform, stood out the police station next to a traditional blue police light. I chose to take a picture of a police man in uniform because the british made the police what they are today really and i thought it would make for a more interesting composition if i took the image with the blue light in it as well. The setting that i used to take this image were -
- ISO - 400
- Aperture - 5.0
- Shutter Speed - 1/320
- No Flash
- White Balance - Auto
To make the image a bit better i photoshopped it by just adding a slight vignette around the edges to give it a bit more shape. Here is the image i took -

Week 11 - PhotoShop Theory - 6th December
In this weeks Systems and Processes seminar we looked and talked about the basic use of Photoshop.
we went through about 14 tools step by step learning how to use each one and what they are for, these are the certain tools we went through and what they each are used for :-
Cropping - improving composition or reformatting
Layers - so actions can be separated for control
Curves - to control contrast
B/W Conversion -
White Balance - to create or remove colour bias
Resize - image dimensions and resolution Image Mode / Bit Depth - Duotones, changing the bit depth File Types - Different files for different functions
Selections and Feathering - for targeting specific areas or zones
Dodging and Burning - to lighten or darken areas of an image
Creative Borders
Cloning tool/ Healing brush - to repair unwanted marks or pixels
Sharpening - making an image appear shaper
Gradient tool - give a sky or similar smooth tone
After discussing each one and being shown how to use them, we were set the task for our next week picture project to get an image, either one we already have or a new one that we have taken and use at least 10 of the photoshop tools to edit our image, we have been set this task to show our understanding.
After discussing each one and being shown how to use them, we were set the task for our next week picture project to get an image, either one we already have or a new one that we have taken and use at least 10 of the photoshop tools to edit our image, we have been set this task to show our understanding.
Week 12 - Weekly Picture Project "Photoshop" - 13th December


For this weeks Weekly Picture Project we were set the task to Photoshop an image that we have either already had, or photoshop an image that we took especially for this weeks project.
The image that i decided to Photoshop, was an image that i already had taken for another project of my own.The image i that photoshopped was of my sister and her 2 little girls out walking.
With photoshopping this image, we had to use at least 10 different photoshop tools to edit it.
The tools that i used were the following -
- Cropping
- Levels
- Curves
- Black and white conversion
- Clone
- Dodge
- Burn
- Sharpening
- Feathering
Here is what the image that i took looked like before i started to edit it.

And here is the same image, but after i finished editing it on Photoshop.

I like what tools i used to photoshop the image because now after editing it, i feels it is a much better image to look at, it looks more effective and more dramatic compared to the original one above.